
Personal injury lawyers often invest heavily in beautiful new websites, only to get minimal results because of technical SEO problems they don’t even know exist.
As a result, your site might rank on page three while a competitor with worse content sits on page one.
The difference often isn’t the content or design – it’s technical errors quietly killing your rankings.
When you fix these technical problems, your rankings can improve dramatically within weeks.
In this guide, I’ll show you how to audit and fix the technical SEO issues that could be costing you cases right now.
Running a Complete Technical SEO Audit
Most personal injury law firm websites have technical problems that nobody’s checking.
A site can look perfect when you visit it but have pages blocked from Google, duplicate titles on service pages, or images so large they take forever to load on mobile.
Everything might look fine in your browser while search engines see a completely different picture.
This is why you need a systematic audit that checks what search engines see, not just what looks good visually.
Using Screaming Frog for Technical Analysis
Screaming Frog is the industry standard tool for crawling your website like Google does.
Think of it as a health scanner for your website that reports back what it finds.
The free version handles up to 500 URLs, which covers most personal injury law firm websites unless you have a massive blog library.
Download it, enter your website URL, and hit start.
Within a few minutes, you’ll see everything Google sees when it crawls your site.
The Response Codes tab is where you should start because it shows the most critical errors first.
You’re looking for three problem areas: 404 errors where pages should exist but don’t, 301 redirects that slow down your site and confuse Google, and 5XX server errors that mean your site is breaking for visitors.
Law firms often have broken links after moving their blog or restructuring their site without setting up proper redirects.
Every broken link signals to Google that the site isn’t well maintained.
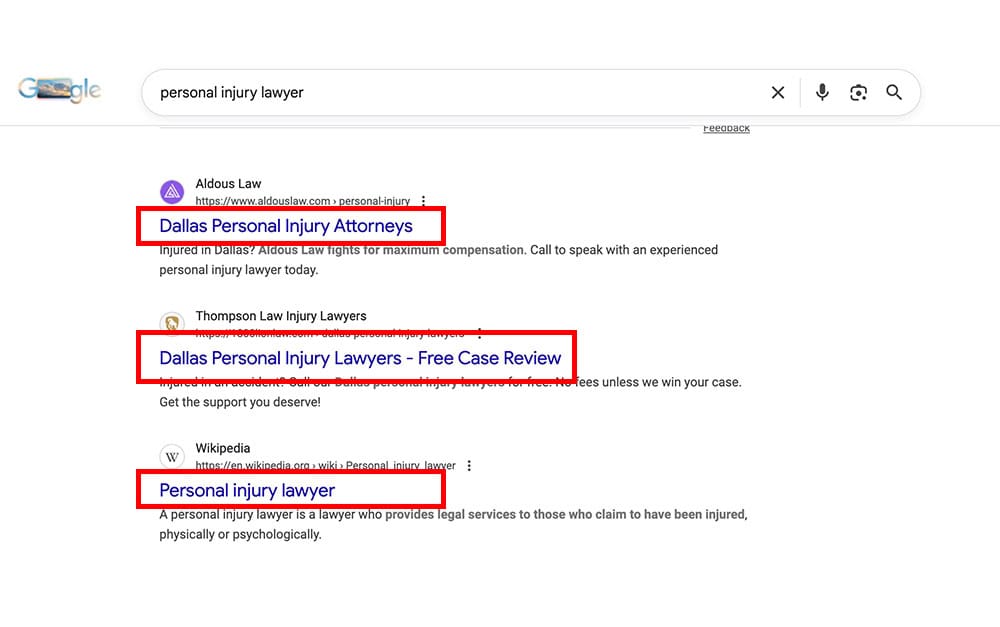
The Page Titles tab shows which pages are missing titles entirely, which is like sending Google a blank business card.
It also catches duplicate titles, which is like having multiple attorneys all introduce themselves with the same name.
If your “car accident” and “truck accident” pages both have the same title, Google has no idea which page to rank for which keyword, and both will suffer as a result.
Check the Meta Description tab next because these are your sales pitch in search results. Missing descriptions mean Google writes its own description by pulling random text from your page, which usually reads poorly.
Some sites end up with their phone number as the meta description on multiple pages because that’s the first text on each page.
The H1 tab reveals pages with no headline tag at all or pages with multiple H1 tags fighting for attention. Both situations confuse search engines about what your page is actually about.
The Images tab is usually where you find quick wins because many law firms upload large image files straight from their camera without compressing them first.
Export all these reports as CSV files so you can work through fixing each issue systematically.
I find it useful to create a Google Sheet with columns for the issue, the page URL, priority level, and status so nothing falls through the cracks.
Checking Your Site’s Google Index Status
This is the fastest way to catch major problems, and it takes 10 seconds.
Type “site:yourlawfirm.com” into Google and hit enter.
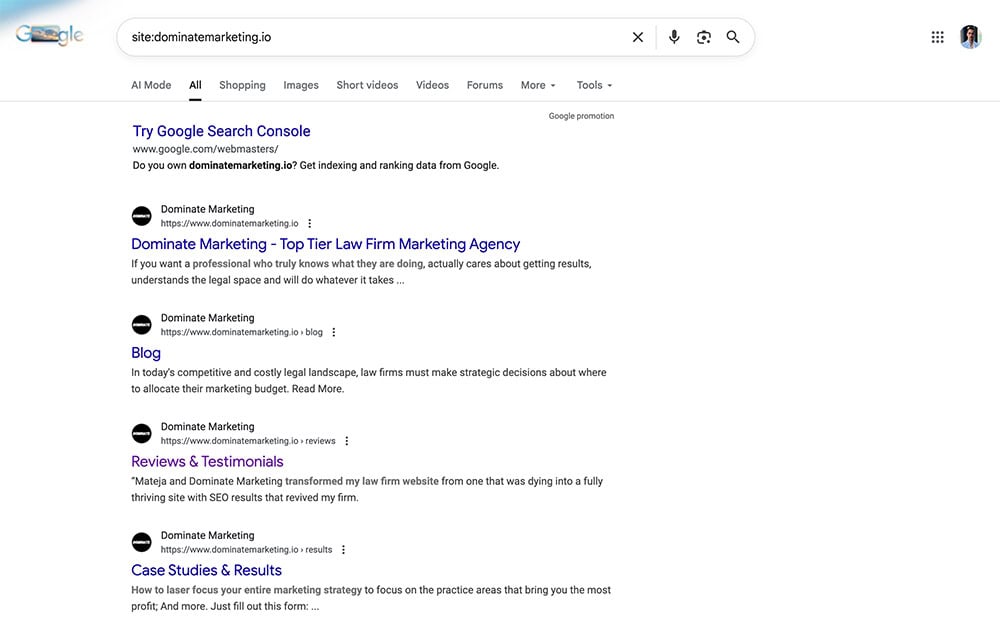
What you see is every page Google has actually indexed from your site.
Sometimes sites have far more indexed pages than they should because previous developers created test pages and never deleted them.
Google ends up indexing junk pages like test drafts instead of actual service pages.
You need to no-index that content so Google focuses on your real pages.
Look for pages that shouldn’t be there: thank you pages from contact forms, admin pages, duplicate versions of the same content, or weird parameter URLs like “?utm_source=facebook&ref=12345.”
If you see stuff like that, you have indexation problems that need fixing.
Now compare how many results Google shows to how many pages your site actually has.
If Google shows 300 indexed pages but you only have 50 pages on your site, something’s wrong.
If Google shows 15 indexed pages but you have 50 pages, that’s even worse because Google isn’t finding or indexing most of your content.
Try searching “site:yourdomain.com personal injury” or “site:yourdomain.com car accident” to see if your important pages show up.
Your main practice area pages should be in the first page of results.
If you have to scroll to page three to find your car accident page on your own site search, that’s a major red flag about your site structure and internal linking.
Analyzing Google Search Console Data
If Screaming Frog shows you what your site looks like from the inside, Google Search Console shows you exactly what Google thinks of your site.
This free tool from Google is incredibly valuable for SEO, yet many law firms never set it up.
If you haven’t verified your site yet, add Google’s verification code to your homepage header to get started.
Once you’re in, go straight to the Pages report under the Indexing section.
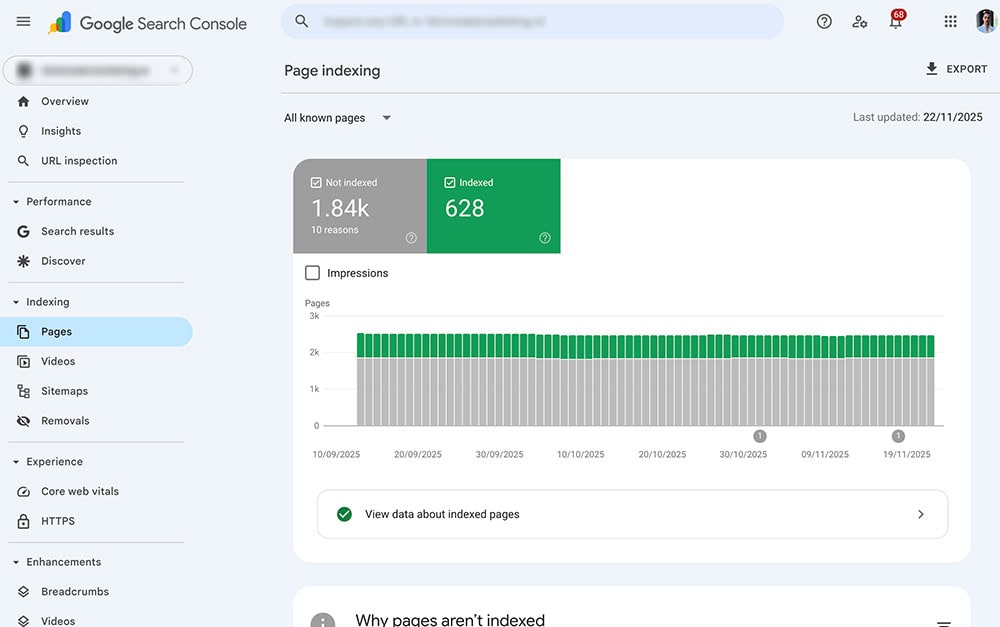
This report is divided into four categories that tell you the complete story of how Google is indexing your site.
Errors are pages Google tried to index but couldn’t, which means potential traffic you’re missing out on.
Sites sometimes have important content accidentally blocked from being crawled, which means months of content marketing work becomes invisible to Google.
Once you fix the blocking issue, Google can start indexing those pages and organic traffic can increase significantly.
Valid with Warnings shows pages that are indexed but have issues like missing meta descriptions or duplicate content.
These pages are ranking, but they’re not performing as well as they could be.
The Excluded section is where things get interesting because it shows pages you either intentionally or accidentally told Google not to index.
Important pages sometimes get excluded by mistake.
A checkbox in WordPress or another CMS might accidentally block a valuable page from ranking.
That single setting could cost significant traffic and potential cases.
The Experience section shows your Core Web Vitals, which measure how fast and smooth your site feels to users.
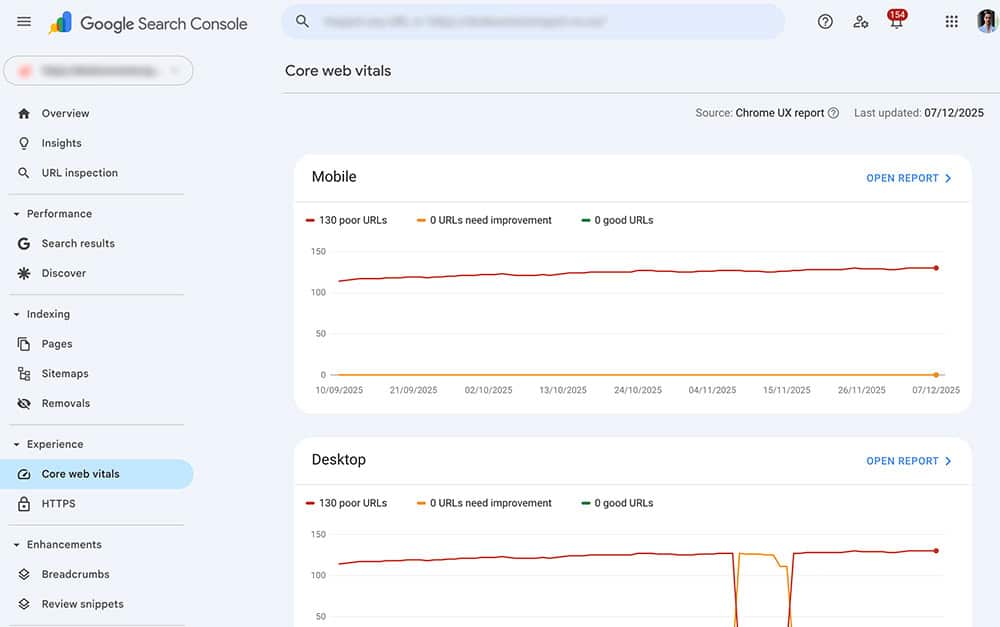
Google confirmed this is part of their ranking algorithm now, so if your pages show up in the “Poor” category, you’re getting outranked by competitors with faster sites even if your content is better.
The Mobile Usability report catches mobile-specific problems like text that’s too small to read or buttons too close together to tap.
Check this dashboard at least once per month because new errors pop up as Google crawls your site and finds problems.
Optimizing Critical On-Page Elements
Once you know what’s broken, it’s time to fix the elements that directly control whether you rank or not.
I see firms obsess over their homepage design while their meta titles are generic garbage that nobody wants to click.
Your on-page elements are the difference between ranking 15th and ranking 3rd, and the difference between ranking 3rd and getting clicked versus ranking 3rd and being invisible.
Let me show you how to optimize each element so you actually get the cases your rankings should be generating.
Meta Titles That Drive Rankings and Clicks
Your meta title is the blue link people see in Google search results, and it’s the single most powerful on-page SEO element you control.
Get it right and you rank well and get clicks.
Get it wrong and you’re invisible even if you rank on page one.
Most personal injury lawyers write titles for themselves instead of for the person searching.
“Smith & Associates Personal Injury Law Firm” tells searchers nothing about what you do or where you do it.
“Los Angeles Car Accident Lawyer | Free Consultation | Smith & Associates” tells them exactly what they need to know and makes them want to click.
Keep your titles between 50-60 characters or Google cuts them off with “…” in search results.
Front-load your most important keyword because people scan from left to right when reading and Google gives more weight to words at the beginning.
“Los Angeles Car Accident Lawyer” is better than “Experienced Lawyer for Car Accidents in Los Angeles.”
Put your location and practice area in every service page title because that’s what people are searching for.
Nobody searches for “legal representation for vehicular collision matters” – they search for “Houston truck accident lawyer.”
Write titles the way real people talk and search.
Add your firm name at the end using a pipe symbol or dash like “Practice Area | Location | Firm Name.”
This builds brand recognition without wasting valuable space at the front of the title.
Never keyword stuff like “Car Accident Lawyer Auto Accident Attorney Vehicle Collision Lawyer Los Angeles” because Google sees through it now and it makes you look desperate.
Important: Every page needs its own unique title targeting different keywords.
If your car accident page and your motorcycle accident page have the same title, they’re competing against each other instead of helping each other rank. As a result, both will rank poorly.
Sites with many pages using the exact same title give Google no way to determine which page should rank for any given search term.
Writing Meta Descriptions That Increase Click-Through Rates
Meta descriptions don’t directly impact your rankings, but they absolutely impact whether you get clicked when you do rank.
Think of them as your 30-second elevator pitch to someone who just searched for a lawyer.
You’re competing against nine other lawyers in those search results, and your description needs to make you stand out.
Google shows up to 160 characters before cutting you off with “…”, so stay within that limit.
Many firms write descriptions like “We are a personal injury law firm dedicated to providing excellent legal services.”
That’s weak because it could apply to any firm and gives searchers zero reason to pick you over the next result.
What works is answering the searcher’s question, including specific numbers or credentials, and telling them exactly what to do next.
For a wrongful death page: “Lost a loved one due to negligence? Our Los Angeles wrongful death attorneys have recovered over $100 million for families. Free consultation available 24/7. Call now.”
That description provides proof you know what you’re doing, tells them there’s no financial risk, and creates urgency.
Use your target keyword naturally in the description, but don’t force it three times just to hit some arbitrary keyword density.
Write like you’re talking to a person who’s scared, confused, and comparing their options.
What would make them click your link instead of scrolling past it?
Check Google Search Console to see your click-through rate for each page.
If you’re ranking position 3 but only getting a 2% click-through rate, your description needs work.
Position 3 should get at least 8-12% click-through rate if your title and description are compelling.
Rewriting descriptions to include specific benefits like dollar amounts recovered, years of experience, or guarantees like “no fees unless we win” can significantly increase click-through rates without changing your ranking position.
Implementing Schema Markup for Rich Results
Schema markup is code you add to your website that helps Google understand what your content actually means.
It’s the difference between Google seeing “John Smith” as random text versus understanding “John Smith is an attorney licensed in California who specializes in personal injury and has 15 years of experience.”
When Google understands your content better, you can get rich results in search that include star ratings, your phone number, business hours, and other details that make your listing stand out.
The three most important schema types for law firms are LocalBusiness, Attorney, and LegalService.
These tell Google you’re a law firm, where you’re located, what you specialize in, and how people can contact you.
Rich results can significantly increase your click-through rate because your listing takes up more space and looks more official than standard blue link results.
Use Google’s Structured Data Markup Helper to create the code without needing to be a developer.
Select “Local Business” as the data type and enter your homepage URL.
The tool lets you highlight elements on your page like your name, address, phone number, hours, and reviews, then generates the code for you.
Add Organization schema to your homepage with your law firm name, logo, social media profiles, and contact information.
Put Attorney schema on your attorney bio pages with credentials, practice areas, bar admissions, and years of experience.
Use FAQPage schema on pages with frequently asked questions because Google sometimes shows these as expandable dropdowns right in the search results.
When you add FAQ schema to pages answering common questions, Google may display those answers as rich results.
These expanded listings take up significant screen space, especially on mobile, and can dramatically improve visibility.
Test your schema using Google’s Rich Results Test tool before you publish it.
Enter your page URL and the tool will show you if your schema is valid and what rich results you’re eligible for.
Fix any errors or warnings because Google won’t show rich results if your schema has problems.
Structuring Headings for SEO and Readability
Your heading structure does two things: it helps search engines understand your content hierarchy, and it helps actual humans scan your page to find what they need.
Most law firm pages I audit have heading structures that make no logical sense because someone just bolded text to make it bigger without using actual heading tags.
Google can’t tell what’s important when your “headings” are just bold text.
Every page should have exactly one H1 tag that serves as the main headline.
This H1 should include your primary target keyword and clearly state what the page is about.
For a truck accident page, your H1 might be “Houston Truck Accident Lawyer” or “Truck Accident Claims in Houston.”
H2 tags are your major section headers that break the page into main topics.
These should include variations of your target keyword or closely related terms.
On that truck accident page, your H2s might be “Common Causes of Truck Accidents,” “Types of Truck Accident Injuries,” and “Compensation in Truck Accident Cases.”
H3 tags break down your H2 sections into smaller subsections.
Under your “Common Causes of Truck Accidents” H2, you might have H3s like “Driver Fatigue,” “Improper Loading,” and “Mechanical Failures.”
Use H4 tags only when you need to break down an H3 section further, which honestly doesn’t happen often on most law firm pages.
Never skip heading levels by jumping from H2 to H4 without an H3 in between.
Google uses heading hierarchy to understand your content structure, and skipping levels is like numbering your outline 1, 2, 5, 6.
It confuses both search engines and readers.
Think of your heading structure as an outline that should make complete sense if you strip away all the body text.
A reader should be able to scan just your headings and understand exactly what topics you cover and how they relate to each other.
If I showed you just the headings from your page and they don’t tell a clear story, your structure needs work.
Image Optimization for Speed and Rankings
Images make your law firm site look professional and trustworthy, but they’re also frequently the biggest technical problem found during audits.
Sites often have hero images that are many megabytes in size because they were uploaded straight from a camera.
Large images can take many seconds to load on mobile, which means most visitors leave before they even see the site.
Here’s how to use images effectively without killing your site speed and SEO.
Naming Image Files Strategically
This is the easiest SEO win most firms completely ignore.
Before you upload any image to your website, rename the file with words that describe what’s in the image.
Your phone’s camera names files “IMG_12345.jpg” or “DSC_8372.jpg,” which tells Google absolutely nothing.
Rename that image of an accident scene to “los-angeles-car-accident-scene.jpg” before uploading it.
Google can’t see what’s in images like humans can, so the file name is one of the ways it understands image content.
Include your location and relevant keywords in the file name, separated by hyphens not underscores or spaces.
Use lowercase letters for everything to keep things consistent and avoid technical issues with case-sensitive systems.
Keep file names reasonably short, ideally under 60 characters.
For photos of your attorneys, use their full name like “john-smith-personal-injury-attorney.jpg” instead of “headshot-2.jpg.”
Office photos should be named descriptively like “smith-law-offices-reception-area.jpg” or “atlanta-personal-injury-law-firm-building.jpg.”
This reinforces your location and brand while giving Google context about what the image shows.
Avoid using generic file names like “hero-image.jpg,” “banner-2.jpg,” or “photo.jpg” because they provide zero SEO value and waste an easy opportunity for your images to rank and add relevance to the page.
Writing Alt Text That Serves Multiple Purposes
Alt text does three important jobs: it helps visually impaired people understand what’s in your images through screen readers, it gives Google context about image content, and it shows as fallback text if images don’t load.
Every single image on your site should have unique, descriptive alt text.
This isn’t optional – it’s both an SEO requirement and an accessibility requirement.
Write alt text that accurately describes what’s in the image while naturally including relevant keywords when appropriate.
For an image of a car accident, write “Severe car accident on Los Angeles freeway showing vehicle damage and emergency response” instead of just “car accident” or worse, “image” or leaving it blank.
Attorney headshots should use alt text like “Sarah Johnson, senior car accident attorney at Smith Law Firm in Houston.”
Keep your alt text under 125 characters when possible because screen readers can cut off longer descriptions.
Don’t keyword stuff by writing “car accident car crash auto accident vehicle collision Los Angeles California attorney lawyer.”
Google sees that as spam and it’s useless for people using screen readers.
Every image needs different alt text even if the images look similar.
If you have three images of car accidents on one page, describe what’s different about each one.
Check all your images in Screaming Frog by looking at the Images tab and filtering for missing alt text.
Law firm sites frequently have dozens of images with no alt text at all, which means Google has no idea what those images are and can’t use them to understand page content or rank them in image search.
Site Speed Optimization and Core Web Vitals
Site speed isn’t just a nice-to-have anymore – it’s a confirmed Google ranking factor that directly impacts whether you get cases or not.
Amazon found that every 100 milliseconds of load time cost them 1% in sales.
For a personal injury law firm, a slow site means potential clients leave before your page loads because they assume your firm is unprofessional or outdated.
Google’s Core Web Vitals are now part of the ranking algorithm, which means slow sites get outranked by faster competitors even if their content is better.
Firms can see significant ranking improvements just by fixing site speed, with no content changes required.
Here’s exactly how to test and fix your speed problems.
Testing Speed with PageSpeed Insights
Google’s PageSpeed Insights tool is free and tells you exactly what’s slowing down your site and how to fix it.
Go to PageSpeed Insights, enter your homepage URL, and wait about 30 seconds while it analyzes your site.
The tool tests both mobile and desktop versions separately because mobile speed is more important since 60-70% of legal searches happen on phones.
You get a score from 0-100 with color coding: green is 90-100, orange is 50-89, and red is 0-49.
Aim for 90 or higher on both mobile and desktop, though mobile is what matters most.
Anything below 50 means you’re likely losing cases to competitors with faster sites.
Sites with very low mobile scores can take 20+ seconds to fully load on a typical 4G connection.
Someone who just experienced a traumatic accident isn’t going to wait that long for your site to load.
They’re gone in three seconds and calling your competitor.
The tool shows you opportunities to improve speed ranked by how much impact they’ll have.
Common problems include large unoptimized images, render-blocking JavaScript that stops the page from loading, unused CSS bloating your code, and slow server response times.
Focus on fixing the “High” impact items first because those give you the biggest speed boost for your effort.
Don’t just test your homepage because every page needs to be fast.
Test your main practice area pages like car accidents, slip and falls, and wrongful death.
Test a few blog posts if you have them.
If certain pages are much slower than others, figure out why – usually it’s a specific plugin, image, or embedded video causing the problem.
Improving Core Web Vitals Metrics
Core Web Vitals sound technical, but they’re just three measurements of what makes a website feel fast and smooth versus slow and janky.
Google uses these metrics to decide if your site provides a good user experience, and they directly impact your rankings now.
Let me break down each one in plain English.
Largest Contentful Paint (LCP) measures how long it takes for the biggest piece of content on your page to load – usually your hero image or main headline.
This should happen in under 2.5 seconds or people bounce.
If your LCP is 6 seconds, visitors see a blank white screen for 6 seconds before anything meaningful appears, which feels broken.
First Input Delay (FID) measures how quickly your page responds when someone tries to interact with it.
If someone clicks a button or tries to scroll and nothing happens for two seconds, that’s a high FID and it’s infuriating for users.
Your FID should be under 100 milliseconds, which means the page responds instantly when clicked.
Cumulative Layout Shift (CLS) measures how much your content jumps around as the page loads.
You know that annoying thing where you’re about to click a link and suddenly an image loads above it, shifting everything down so you click the wrong link? That’s layout shift.
Your CLS score should be under 0.1, which means content stays stable as it loads.
Check your Core Web Vitals in Google Search Console under the Experience section.
You’ll see how many URLs are marked as “Poor,” “Needs Improvement,” or “Good” for both mobile and desktop.
Focus all your efforts on fixing the “Poor” URLs first because those are actively hurting your rankings.
The most common fixes are compressing images so they load faster, implementing lazy loading so images below the fold don’t load until someone scrolls to them, minimizing JavaScript code that blocks page rendering, and using a content delivery network (CDN) to serve images faster.
Reserve specific space for images in your code so when they load, they don’t push other content around and create layout shift.
Compress every image before uploading using free tools like TinyPNG or ImageOptim.
A 2MB image can usually be compressed to 200KB with zero visible quality loss, making it load 10 times faster.
Use modern image formats like WebP which provide way better compression than old JPEG or PNG formats.
Enable browser caching so when someone visits your site a second time, their browser uses saved files instead of downloading everything again.
This makes return visits almost instant.
Minimize your CSS and JavaScript files by removing unnecessary code and comments.
Go through your plugins or third-party scripts and delete anything you’re not actively using.
Every plugin adds code that slows down your site, and most firms have 15 plugins when they only need 6.
If you’re on WordPress, consider using a caching plugin like WP Rocket that handles a lot of these optimizations automatically.
Internal Linking Architecture
Internal linking is one of the most powerful SEO tactics that many law firms get wrong or ignore completely.
Links from one page on your site to another page on your site tell Google which pages are most important and help spread ranking power from your strong pages to your weaker pages.
Proper internal linking strategies can significantly increase organic traffic without requiring new content or backlinks.
Most personal injury sites link to their homepage excessively while barely linking to practice area pages, which is backwards.
Your homepage is already the strongest page on your site – it doesn’t need more help.
Your practice area pages that are ranking on page two need internal links to push them to page one.
Creating a Logical Site Hierarchy
Your site structure should be organized so that your most important pages are easy to find for both users and search engines.
Nothing important should be more than three clicks away from your homepage.
If someone has to click through five pages to find your car accident practice area, Google thinks it’s not very important.
Your homepage should link directly to your main practice areas in your navigation menu.
Those practice area pages should link to more specific subcategory pages when relevant.
For example, your homepage links to “Car Accidents,” which links to more specific pages like “Rear-End Collisions,” “Head-On Collisions,” and “Hit and Run Accidents.”
This creates a pyramid structure that Google can easily understand and crawl.
Every single page on your site should have at least one internal link pointing to it from somewhere else.
Orphan pages with no internal links might as well not exist because Google might never find them.
Use your main navigation for your most important pages – practice areas, about page, contact page, blog.
Add footer links to secondary pages like your FAQ section, resources, testimonials, or case results.
Within your actual page content, include contextual links that naturally point readers to related pages where they can learn more.
Detailed resource pages that never get linked from main service pages often get zero traffic because Google can’t find them.
Adding relevant contextual links from appropriate service pages can help these resources start generating traffic and leads within weeks.
Optimizing Anchor Text for Internal Links
Anchor text is the clickable text in a link, and it’s critically important because it tells Google what the page you’re linking to is about.
Generic anchor text like “click here” or “read more” or “learn more” is completely wasted because it provides zero context.
Descriptive anchor text that includes relevant keywords helps the linked page rank for those keywords.
For a link to your truck accident page, use anchor text like “Los Angeles truck accident lawyer” or “filing a truck accident claim” instead of “our truck accident practice” or “this page.”
The anchor text should describe what’s on the destination page in a way that includes keywords naturally. A rule I like to use is use anchor text that matches a keyword (or variation of it) that you want that page to rank for.
If your wrongful death page is trying to rank for “wrongful death attorney Atlanta,” then links to that page should use variations of that phrase.
Vary your anchor text so you’re not using the exact same phrase every single time you link to a page.
Use a mix of exact match keywords like “wrongful death attorney,” partial match phrases like “filing a wrongful death lawsuit,” branded terms like “our wrongful death lawyers,” and natural variations like “legal representation for wrongful death claims.”
This looks natural to Google and helps you rank for multiple keyword variations.
Don’t over-optimize by using exact match keywords for every internal link because that looks manipulative. Sites with many internal links all using identical anchor text raise red flags with Google.
Mix in some branded terms and natural language links along with your keyword-focused anchor text.
You can run a Screaming Frog crawl and export your internal link data to see what anchor text you’re currently using.
Look for patterns like using “click here” repeatedly or never using your target keywords in anchor text.
Make sure your most important pages have multiple internal links with varied, descriptive anchor text that includes their target keywords.
Robots.txt, Indexation Controls, and Error Management
These technical elements control what search engines can see and index on your site, and mistakes here can block your entire site from ranking.
Accidentally no-indexing an entire site or blocking Google from accessing critical resources are catastrophic errors that happen more often than you’d think.
These issues are straightforward to fix once you know where to look.
Auditing Your Robots.txt File
Your robots.txt file is basically a set of instructions that tells search engines which parts of your site they can and cannot crawl.
It’s powerful, which means mistakes can be devastating.
Access your robots.txt file by typing yourdomain.com/robots.txt into your browser and seeing what comes up.
For most personal injury law firm websites, your robots.txt file should be extremely simple.
It should say “User-agent: * Allow: /” which means “all search engines are allowed to crawl everything.”
You should only block genuinely private sections like admin areas, login pages, search result pages, or duplicate content you can’t remove.
Never block important directories like /wp-content/ or /images/ because that prevents Google from accessing your CSS, JavaScript, and images.
Sites sometimes accidentally block these directories thinking they’re just administrative files.
This blocks all CSS and images, so Google renders the entire site as unstyled text with no images, which looks completely broken and kills rankings.
If you see anything in your robots.txt that says “Disallow: /practice-areas/” or “Disallow: /blog/” or anything else that sounds like important content, delete it immediately.
Check specific URLs using Google Search Console’s URL Inspection tool to see if they’re being blocked.
If the tool says “Blocked by robots.txt,” you need to edit your robots.txt file to allow access to that URL.
The most common mistake is using overly aggressive robots.txt rules from some SEO plugin that blocks way more than it should.
Keep it simple: allow everything except admin areas and duplicate content, and you’ll be fine.
Managing No-Index Tags Properly
The no-index meta tag is a small piece of code that tells search engines “do not include this page in your index.”
It’s useful for pages you don’t want ranking, but it’s also the source of many catastrophic SEO errors.
Check if a page has a no-index tag by viewing the page source code and searching for “noindex” – if you find it, that page will never rank no matter how good it is.
Use no-index intentionally for pages like thank you pages after form submissions, PPC landing pages with thin content designed only for paid traffic, confirmation pages, and search result pages on your site.
These pages either provide no value in organic search or would create duplicate content problems.
You can also no-index pages with duplicate content that you can’t remove but don’t want competing with your main pages.
The problem is when you accidentally no-index important pages.
Main practice area pages sometimes get set to no-index because someone checked the wrong box in WordPress years ago.
A page can have great content and tons of backlinks but rank nowhere because it’s no-indexed.
To check this run a Screaming Frog crawl and filter for pages with no-index tags.
Go through each one and ask yourself: should this page be ranking in search results?
If yes, remove the no-index tag immediately.
If no, leave it alone.
Check your important pages manually by viewing the source code and searching for “noindex.”
If you find it on a page that should be ranking, that’s your problem right there.
Remove the tag, submit the URL for re-indexing in Google Search Console, and within a few days Google will start indexing it again.
Finding and Fixing 404 Errors
404 errors happen when someone clicks a link to a page on your site that no longer exists, and they see a “Page Not Found” error instead.
These errors create a terrible user experience and waste valuable link equity from internal and external links.
If someone searches for your firm, clicks a link, and gets a 404 error, they’re likely gone forever.
Check Google Search Console’s Pages report for 404 errors that Google has discovered.
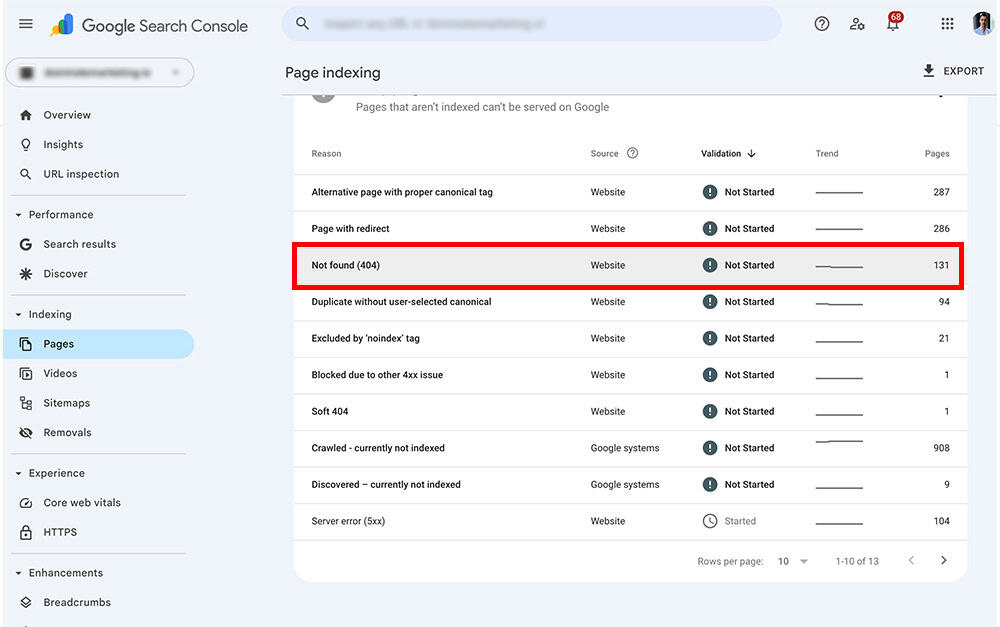
These are pages Google tried to crawl but couldn’t find, usually because you deleted the page or changed the URL without setting up a redirect.
Screaming Frog also finds 404 errors by checking every internal link on your site and flagging broken links.
Go through your list of 404 errors and decide what to do with each one.
If the old page had valuable content and you just moved it to a new URL, create a 301 redirect from the old URL to the new URL so anyone clicking the old link automatically goes to the new page.
If the old page no longer exists and has no equivalent, you have two options: create new content at that URL if it was getting traffic, or just remove any internal links pointing to it.
Firms that redesign websites and change all their URLs without setting up redirects often end up with dozens of broken links from their own site and hundreds more from external sites.
Setting up 301 redirects for every old URL to its new equivalent typically results in traffic recovery within a few weeks.
External websites linking to your 404 pages are particularly damaging because you’re wasting valuable backlinks.
If a legal directory links to your old page that’s now a 404, that backlink provides zero value.
Set up a redirect and suddenly that link helps you rank again.
Monitor your 404 errors regularly because new ones appear as you update pages, change URLs, or reorganize content.
It’s also good practice to set up a custom 404 page that helps visitors find what they’re looking for instead of just saying “Error” and leaving them stranded. Include links to your main practice areas, a search box, and your contact information so people can still convert even if they hit a broken link.
Additional Critical Technical SEO Elements
Beyond the core technical factors I’ve covered, there are several other elements that can make or break your rankings.
These might seem like minor details, but I’ve seen each one of these cause serious ranking problems when ignored.
Here’s what else you need to check and fix.
SSL Certificate and HTTPS
If your website still uses HTTP instead of HTTPS, fix that today because it’s hurting your rankings and scaring away potential clients.
HTTPS encrypts data between your site and visitors, which is critical for a law firm website where people are sharing sensitive information through contact forms.
Google confirmed HTTPS as a ranking factor years ago, and Chrome browsers now show “Not Secure” warnings for HTTP sites, which makes you look unprofessional or even dangerous.
Check if your site uses HTTPS by looking at the URL bar when you visit your site.
You should see a lock icon and your URL should start with “https://” not “http://”
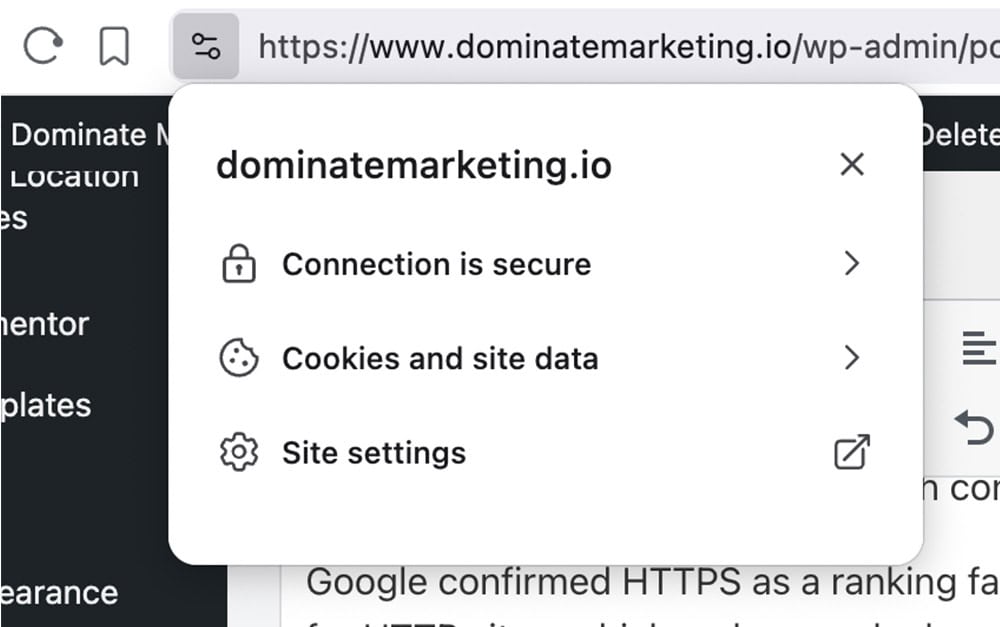
If you see “Not Secure” or no lock icon, your site is using HTTP and needs an SSL certificate immediately.
Contact your hosting provider and ask them to install an SSL certificate – most hosts include this free now.
After the SSL certificate is installed, you need to set up 301 redirects from every HTTP URL to its HTTPS version so people and search engines automatically go to the secure version.
Update all your internal links to use HTTPS to avoid unnecessary redirects that slow down your site.
This is not optional anymore.
A personal injury lawyer website without HTTPS looks sketchy, ranks worse, and likely violates data protection standards depending on your state.
XML Sitemap Optimization
Your XML sitemap is a file that lists all the pages you want search engines to crawl and index, kind of like a table of contents for Google.
Most websites generate sitemaps automatically through their CMS or an SEO plugin, so you probably have one already.
Check by going to yourdomain.com/sitemap.xml in your browser – if you see a list of URLs, you have a sitemap.
Submit your sitemap to Google Search Console so Google knows exactly where to find it and can use it to discover all your pages.
Your sitemap should only include pages you actually want indexed – remove any no-indexed pages, redirected URLs, or pages with errors.
Every time you add or remove significant pages from your site, your sitemap should update automatically, but check periodically to make sure it’s working correctly.
Some firms have multiple sitemaps for different sections like one for pages, one for blog posts, one for images.
That’s fine and can actually help with very large sites, but most personal injury law firm sites can use a single sitemap without problems.
Mobile Optimization
More than 60% of people searching for personal injury lawyers are doing it on their phones, which means if your site doesn’t work perfectly on mobile, you’re losing more than half your potential cases.
Not only that, but Google now uses mobile first indexing, which means a poor mobile site will directly impact your rankings.
Your site should use responsive design that automatically adjusts to any screen size, from a massive desktop monitor to a tiny phone screen.
Test your mobile experience using Google’s Mobile-Friendly Test tool to see if you have any mobile-specific problems.
The most common mobile issues I find are text that’s too small to read without zooming, buttons too small or too close together to press accurately, and content wider than the screen that requires horizontal scrolling.
All of these frustrate users and send them to your competitor’s site.
Check your site on actual mobile devices, not just the mobile preview in your browser, because the real experience often has problems the simulator doesn’t show.
Look at your contact buttons – can someone easily press them with their thumb, or are they tiny and require precision pressing?
Always make phone numbers clickable so people can call you with one press instead of having to copy and paste the number.
Also make sure to check your forms on mobile because small form fields and tiny submit buttons which people struggle to fill out will lose you cases.
Duplicate Content Issues
Duplicate content confuses Google about which version of a page to rank when you have multiple pages with the same or very similar content.
If you have two pages on “car accident lawyer” and “auto accident attorney” with identical (or very similar) content addressing the same user intent, Google picks one to rank and ignores the other, which wastes all the work you put into both pages.
The solution is canonical tags, which tell Google “this is the main version of this content, ignore the duplicates.”
Add a canonical tag to every page pointing to itself as the authoritative version.
This prevents issues if someone creates duplicate versions of your pages by adding URL parameters or accessing your site through different domains.
When you intentionally have similar pages, use canonical tags on the duplicate pages pointing to the main version you want to rank.
Check for duplicate content by copying unique phrases from your pages and searching for them in quotes on Google.
If multiple versions of your pages appear in results with different URLs, you have a duplicate content problem.
Consolidate duplicate pages when possible by merging the content into one comprehensive page, or use canonical tags to point duplicates to your preferred version.
Sites with multiple pages targeting the same keywords with mostly identical content often see all pages competing against each other and ranking poorly.
Consolidating them into one comprehensive page typically results in better rankings within weeks.
Structured Data Testing
After you implement schema markup, you need to test it regularly to make sure it’s still working correctly.
Schema code can break when you update your site, and broken schema means you lose your rich results in search.
Use Google’s Rich Results Test tool by entering any page URL and waiting for it to analyze your schema.
The tool will show you exactly what structured data it found and whether you’re eligible for rich results.
Fix any errors immediately because even small mistakes can disqualify you from getting rich results.
Warnings are less critical but should still be addressed when possible.
Monitor the Performance report in Google Search Console filtered by “Search Appearance” to see if you’re actually getting rich results for any of your pages.
Pages with rich results typically get 20-40% higher click-through rates than standard listings.
If your schema is valid but you’re not getting rich results, it might mean Google doesn’t think your content is high enough quality or your page isn’t ranking well enough to qualify.
Need Help With Technical SEO for Your Personal Injury Firm?
Most personal injury lawyers don’t have time to learn technical SEO, run regular audits, monitor Search Console, fix Core Web Vitals, and stay on top of everything covered in this guide.
You’re busy running your practice and serving clients, which is exactly what you should be doing.
But technical SEO problems cost you cases every single day they go unfixed.
Many personal injury law firms have strong track records but aren’t getting enough cases from their website because of technical issues they don’t even know exist.
As a specialized SEO agency for personal injury law firms, I handle all technical SEO work personally to ensure your site is properly optimized from the ground up.
My PI SEO Growth Engine includes a comprehensive technical audit and fixes as part of the initial Activation Sprint, with ongoing monitoring and optimization. I guarantee execution deliverables so you know work is actually getting done.
Contact us today by filling out the form below to get your technical SEO audit and start ranking above your competitors.